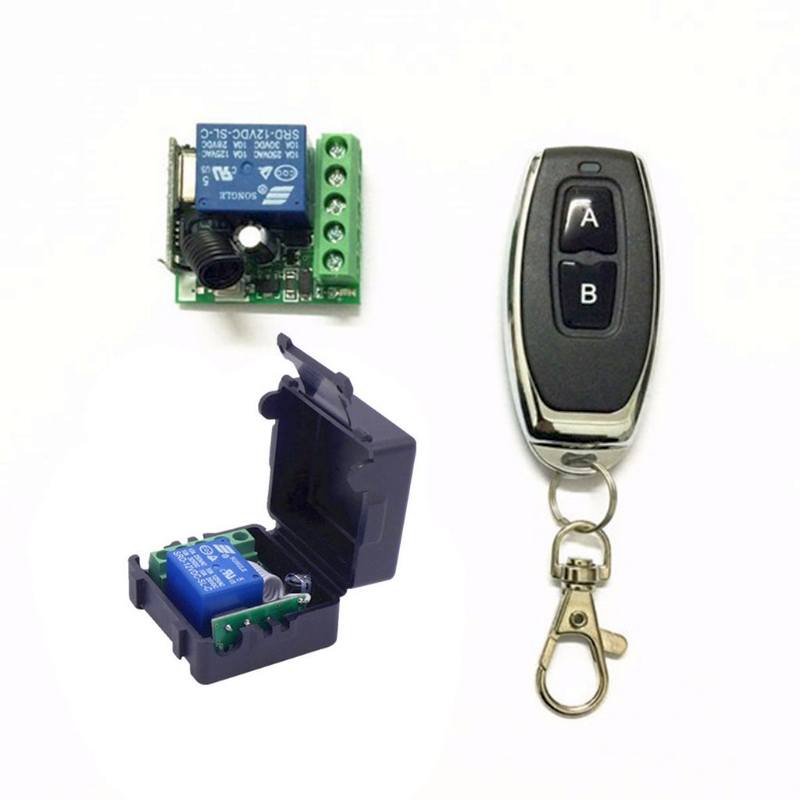
Описание
Модуль 1-о канального радиоуправляемого реле 433 МГц
Режимы работы: Моментальный (Momentary), Переключение (Toggle) и Фиксированный (Latched).
1. Нажимаем кнопку Learn на плате 1 раз. Ждем мигания диода. Нажимаем на пульте кнопку. Диод мигает еще раз и устанавливается режим работы «1» — Моментальный.
Он служит для активации устройства в момент удержания кнопки. Условно — держим кнопку на пульте — горит подстветка.
2. Нажимаем кнопку Learn на плате 2 раза. Ждем мигания диода. Нажимаем на пульте кнопку. Диод мигает еще раз и устанавливается режим работы «2» — Переключение.
Нажимает кнопку на пульте — устройство включается. Нажимает повторно эту же кнопку — устройство выключается.
3. Нажимаем кнопку Learn на плате 3 раза. Ждем зажигания диода. Нажимаем на пульте кнопку А. Диод на плате мигает. Затем нажимаем на пульте кнопку В. Диод опять мигает и гаснет.
Теперь включение устройства будет только по кнопке А, а выключение — по кнопке В.
Самый удобный режим для меня))))
About Working mode:
— Momentary: Push the remote button, the relay connects, release the remote button, the relay dis-connects.
— Toggle: Push once the remote button, the relay connects, push twice the remote button, the relay dis-connects .
— Latching: Push the remote button A, the relay connects, push the remote button B, the relay dis-connect.
— Time delay mode: Push the remote control button, the relay connects, from when release the remote button, after 5s or 10s or 15s, the relay disconnect automatically.
Clearing the code:
— Push the learning button on the receivers for 8 times, the codes will be cleaned.
— After clearing the code, all the remote control cannot work any more.
Learning the code: ( Momentary )
— Push the learning key on the receiver once time, it comes into momentary setting mode.
— Wait for a moment, the LED will be off , it comes into learning state.
— Push the remote button, LED indicator on the receiver board will flash then come off.
— After 3 seconds, the LED indicator will be on again, learning successfully.
Learning the code: ( Toggle )
— Push the learning key on the receiver twice time, it comes into toggle setting mode.
— Wait for a moment , the LED will be off, it comes into learning state.
— Push the remote button, LED indicator on the receiver board will flash then come off.
— After 3 seconds, the LED indicator will be on again, learning successfully.
Learning the code:( Latching )
Note: When you choose for latching mode, in order to learn more remote control, you need to learn two different button, the first time learnt is for «ON», the second time learnt for «OFF».
For example: button A = ON , button B = OFF
— Push the learning key on the receiver triple time, it comes into latching mode .
— Wait for a moment, the LED indicator on the receiver board will flash then come off.
— Push the remote button A.
LED flash for 5 times.
— Push the remote button B.
Led flash for 5 times.
— After 3 seconds, the LED indicator will be on again, learning successfully.
A = ON, B = OFF.
Learning the code: ( Time delay mode )
— Push the learning key on the receiver forth time, the time dealy for 5 seconds.
— Push the learning key on the receiver fifth time, the time delay for 10 seconds.
— Push the learning key on the receiver sixth time, the time delay for 15 seconds.
The LED indicator will be off.
— Push the remote button , LED flashes and off .
— After 3 seconds, the LED indicator will be on again, learning successfully.
NOTE: The system can store for 50 pcs of remotes, if the remote get more than 50pcs, the initial remote control will be lost.
Specifications:
Model: KR2201-4
Material: Plastic + Metal
Color: Black
Dimension of PCB: (L×W×H) 35×30×18mm/1.38×1.18×0.71in (Approx.)
Input Power: DC10V-14V
Standby Current: <5MA
RF Frequency: 315M or 433M
RF working mode: superheterodyne
Receive sensitivity: >97dbm
Transmitting distance: >100m (open space)
Decoding mode: MCU software decoding
Remote storage: 25pcs
Support remote type: Learning code, Fixed code(Rolling code can be design)
Working mode: Momentary, Toggle, Latching Time delay (5s ,10s ,15s )
Wiring type: fixed terminal
Output Terminal: NO , NC , COM
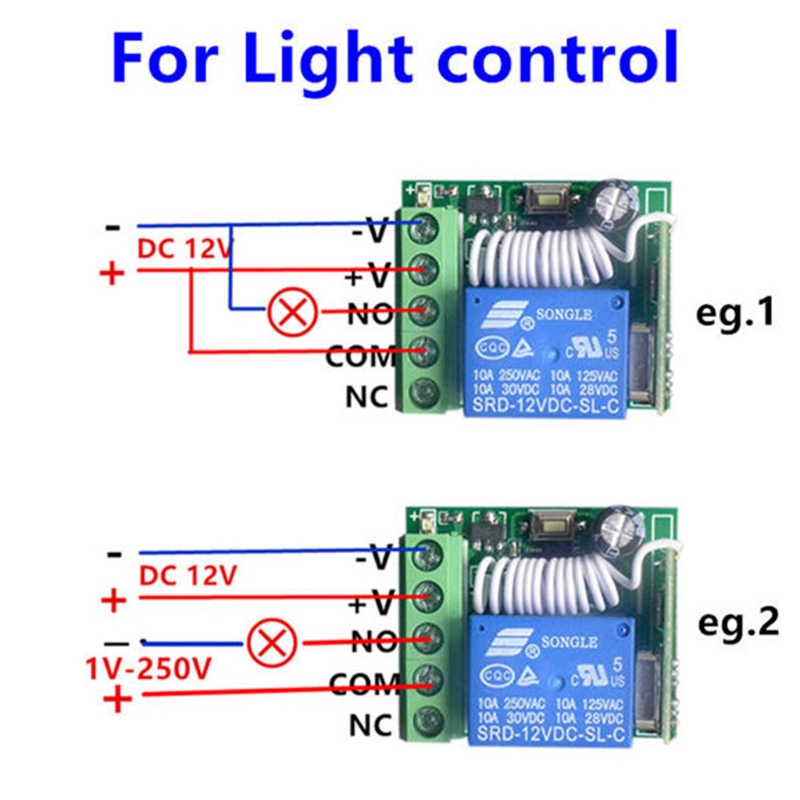
Wiring diagram:
+V : 12V + input ;
— V: 12V — input ;
NO: Output, normal open;
COM: Output, common ;
NC: Output, normal close


Отзывы
Отзывов пока нет.